15% OFF from 24 June - 7 July (inclusive)
Excludes; Tim Webber, Rebecca Asquith & Tim Wigmore, Gus Leen, Bart de Vries and Peter Hayvice's kauri range.
10 Years Discount Code : 10YEARS15%OFF
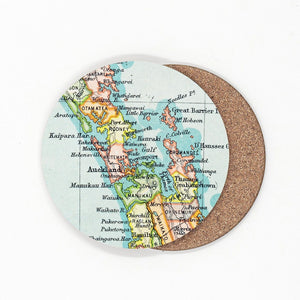
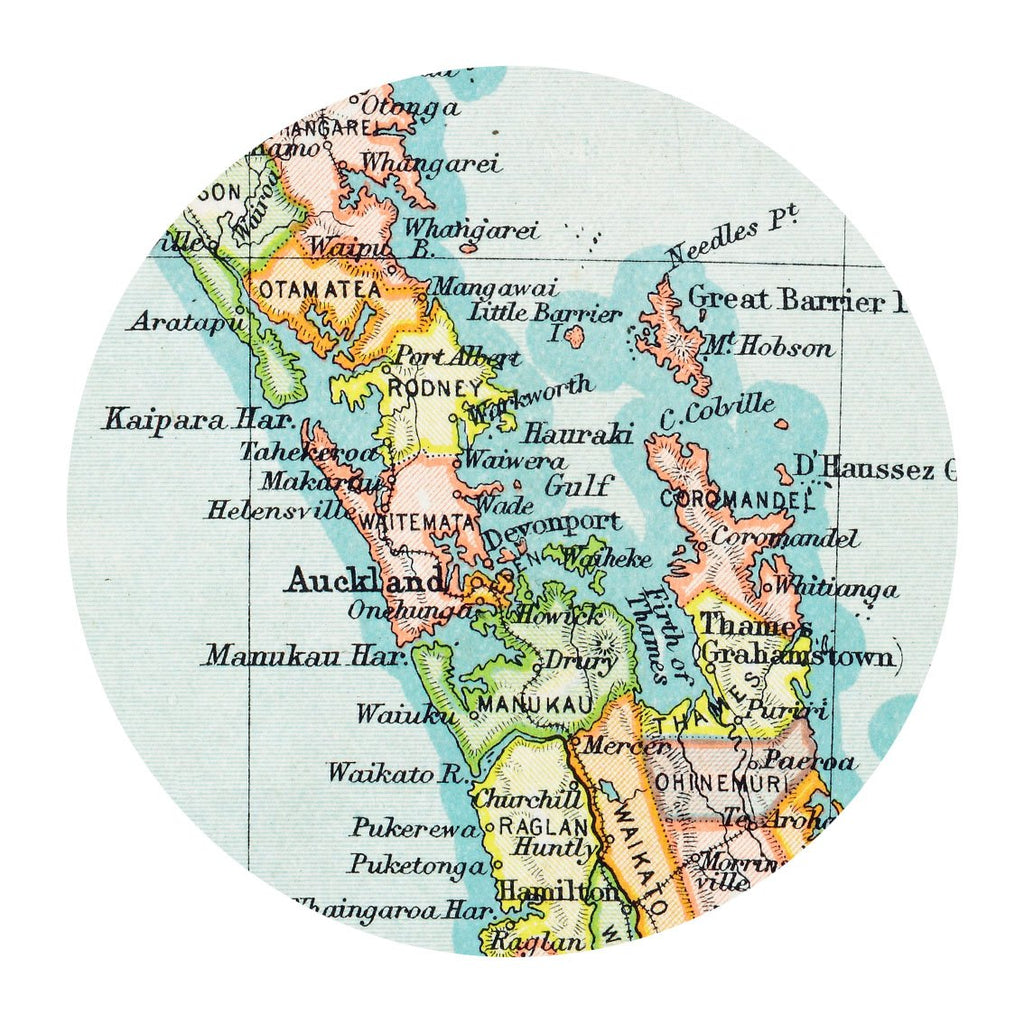
Vintage NZ Map Coasters

Vintage NZ Map Coasters
$6.00
A fun and colourful collection of coasters featuring Vintage NZ Map extracts of New Zealand regions. The coasters are heat resistant, hard wearing and an ideal gift to send by post. Wipe clean only. Sold individually. Material print on coated MDF, cork backed Size 100Dia mm Check out other placemats & coasters

Rimu Bottle Opener

Rimu Bottle Opener
$29.00
The Rimu Bottle Opener handcrafted from recycled NZ rimu and a genuine NZ nail is a winning combination. It is magnetised with one magnet to attach the opener to the fridge, so you always know where it is; and one magnet to hold the cap once released, so you don’t have to bend down and pick it up off the floor. You shouldn't have any trouble ope...
Spray Glow Furniture Polish
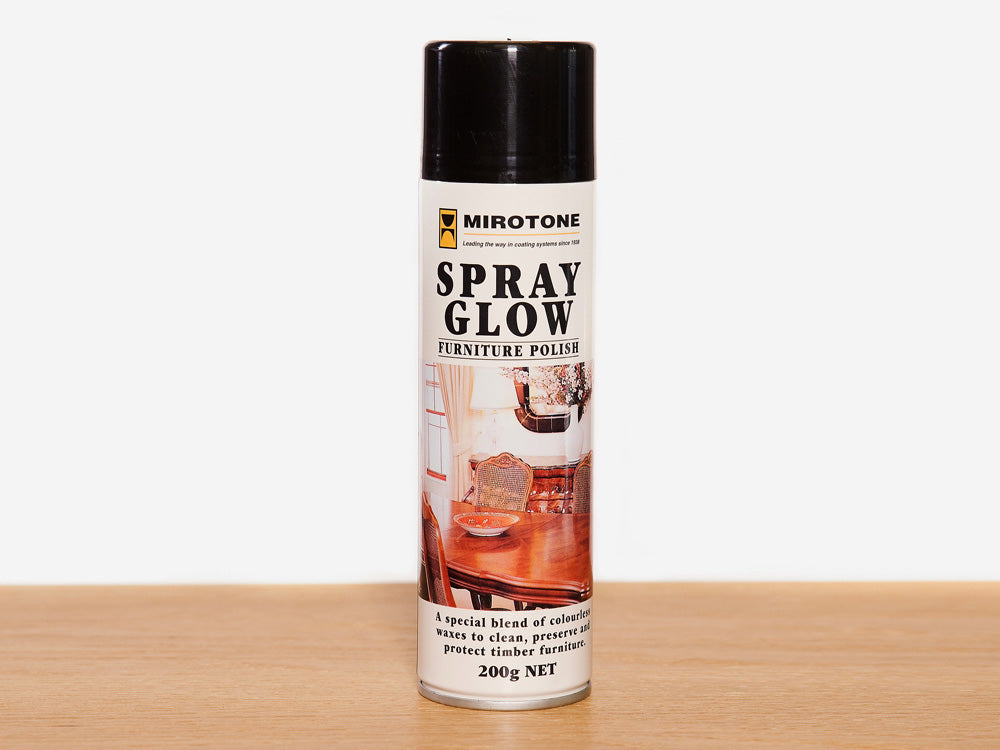
Spray Glow Furniture Polish
$29.00
Spray Glow is used and recommended by the leading manufacturers of furniture to introduce and preserve a deep lustrous, no-shine glow. Pleasant to use Spray Glow is especially formulated from the correct proportions of natural oils and waxes to clean and enrich (without harming or darkening) furniture and fittings, including natural timbers teak...

Vintage NZ Map Placemats
Vintage NZ Map Placemats
$14.00
A fun and colourful collection of placemats featuring Vintage NZ Map extracts of New Zealand regions. The placemats are heat resistant, hard wearing and an ideal gift to send by post. Wipe clean only. Sold individually. Material print on coated MDF, cork backed Size 290Dia mm Check out other placemats & coasters

iO Drum Light Shade
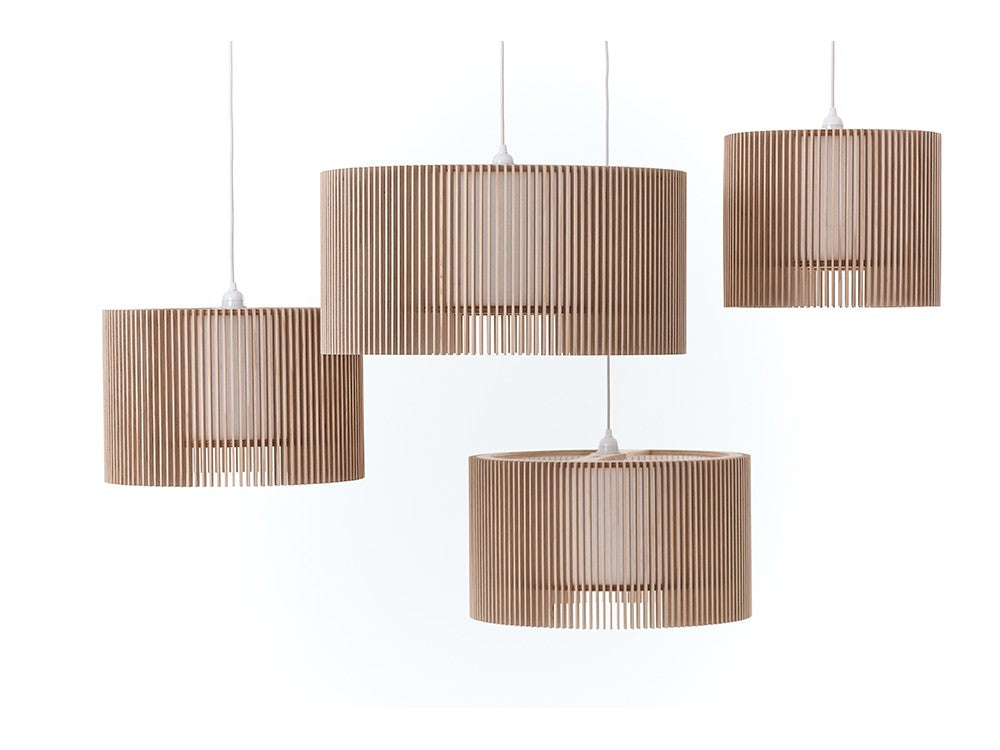
iO Drum Light Shade
$799.00
iO Drum light shade is created using a mix of traditional craft skills and digitally based production methods, balancing between the realms of human and digital fabrication. This allows for a product that has meticulous detail in a simple form. Each iO Drum is unique, yet precise, eclipsing the challenges of its creation. The light emitted with ...
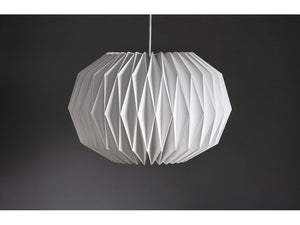
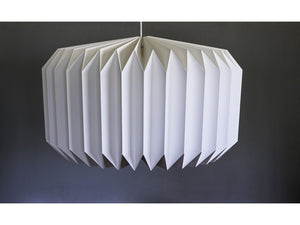
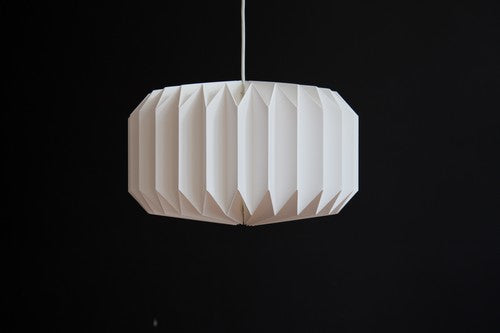
Seed Light Shade
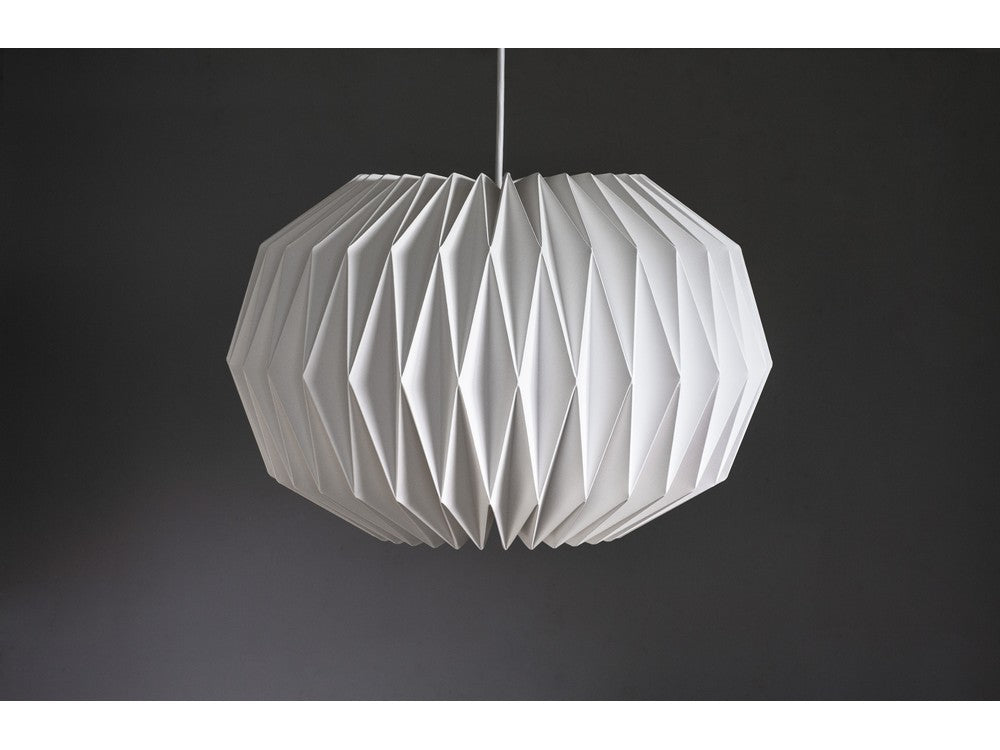
Seed Light Shade
$299.00
The Seed light shade's simple and elegant geometric design brings a timeless look to any room. Handcrafted from one continuous sheet of heavy weight paper or synthetic (PU) paper, Seed is designed for a pendant light fitting and produces a bright, diffused ambient light. Material heavy grade paper or PU (synthetic white paper) Flat-packed for ...

West Coast Stone Floor Mats

West Coast Stone Floor Mats
$199.00
West Coast Stone floor mats are ready to use as an entrance mat, bath mat, shower mat or anywhere you chose. Weatherproof and durable, these floor mats are suitable for both indoors and outdoors use. Each West Coast Stone floor mat is individually handcrafted by a small team of stone weavers who hand harvest the stones from the rugged West Coast...

Nectar Light Shade
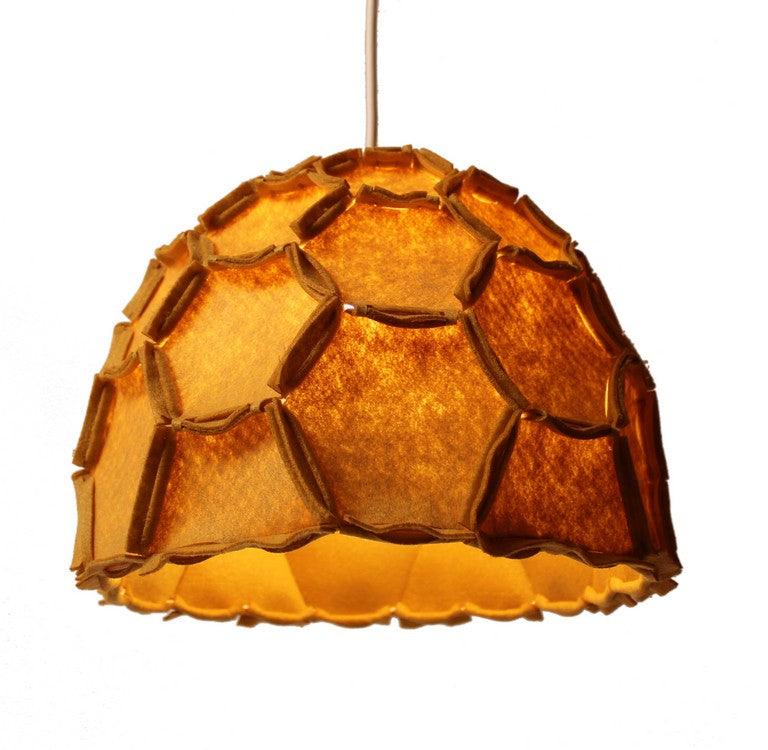
Nectar Light Shade
$525.00
Nectar light shade draws inspiration from beehives. A honeycomb cell is one of nature’s most efficient designs - not one surface is unnecessary. The cell is strong, structurally sound, and very light compared with the volume of delicious liquid that is stored within. During the day Nectar is a soft reminder of the beauty of nature and the amazin...

Wooden Soap Keeper
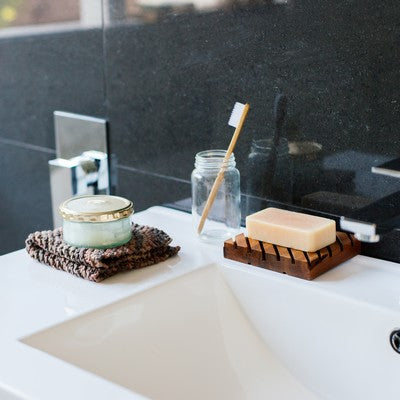

Wooden Soap Keeper
$15.00
Make sure your soaps are looking and feeling their finest. Each handcrafted Wooden Soap Keeper is unique, and will vary in terms of the dimensions, grain, knots and patina from previous life as a floorboard (Rimu only). That's what makes them so special. Care for yours by rinsing with water and leaving to dry in the sun. Material sustainably sou...

YOYO Gift Voucher

YOYO Gift Voucher
$50.00
YOYO Gift Vouchers are perfect for year-round giving, promotions and incentives for friends, family, employees, customers and business associates. You can receive the voucher via email, or collect it from our Wellington showroom (indicate your preference in the 'deliver instructions' box). Either way, please select 'Pick up in-store' as your shi...

Dibber Planting Tool
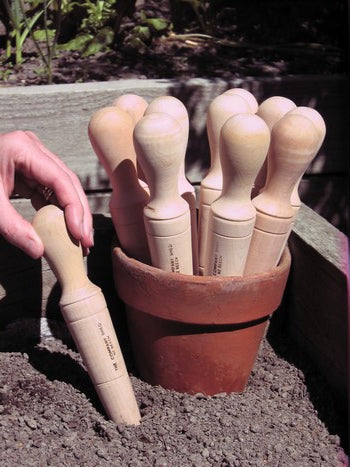
Dibber Planting Tool
$19.00
Reintroducing an old fashioned gardening tool that makes the planting of vegetables, bulbs and crops much easier. With grooves that indicate planting depths of 5, 10 and 15cm, simply insert Dibber into the soil to make a hole, rotate to make a larger hole, remove and then plant your various plants or bulbs. Made in New Zealand Material sustainab...

Indira Cushion
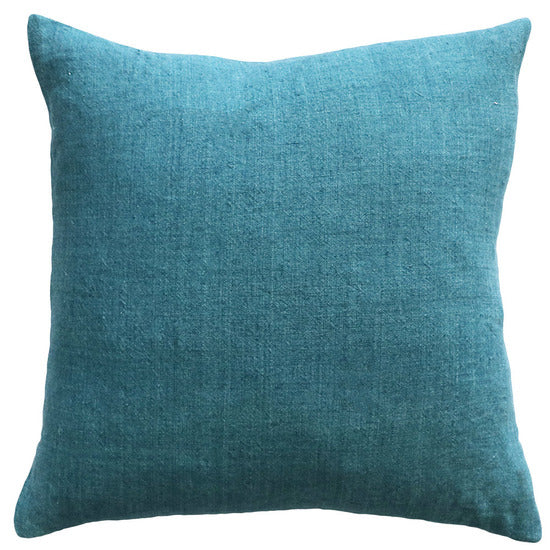
Indira Cushion
$99.00
Relax with a comfortable, oversized Indira cushion; 100% linen enzyme washed for a softer handle and a sophisticated, gently distressed finish. Material 100% linen (outer), feather (inner) Size 550 x 550 mm Check out other Essential cushions
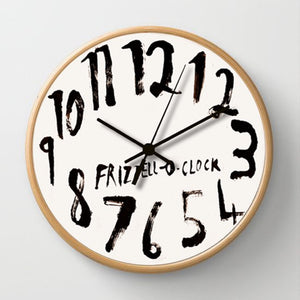
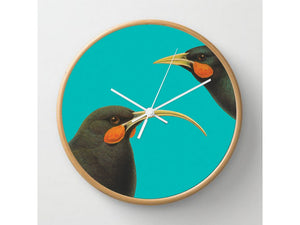
Frizzell O-Clock
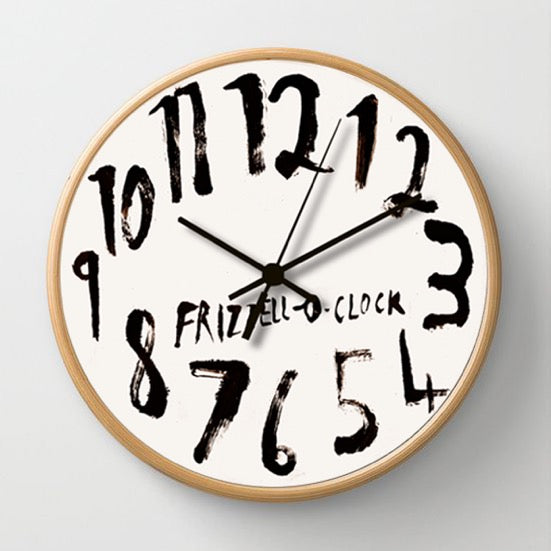
Frizzell O-Clock
$119.00
Blonde wood framed Frizzell O-Clock features artwork by renowned New Zealand artist Dick Frizzell. The silent movement clock is protected by a glass front and sits 45mm deep from the wall. Dick Frizzell (1943-), is one of New Zealand's most high profile contemporary artists. His work is best described as pop in its appropriation of kitsch kiwian...
Gordon Walters Print - Tama
Gordon Walters Print - Tama
$139.00
Wellington born artist and graphic designer Gordon Walters (1919 - 1995) is renowned for combining the symbolic Maori koru with European abstraction in seemingly endless ways. For Maori, the koru symbolises new life and has a special place in customary art. Its use by non-Maori artists such as Walters has been hotly debated. Tama (1977) was Walt...
VFold Light Shade
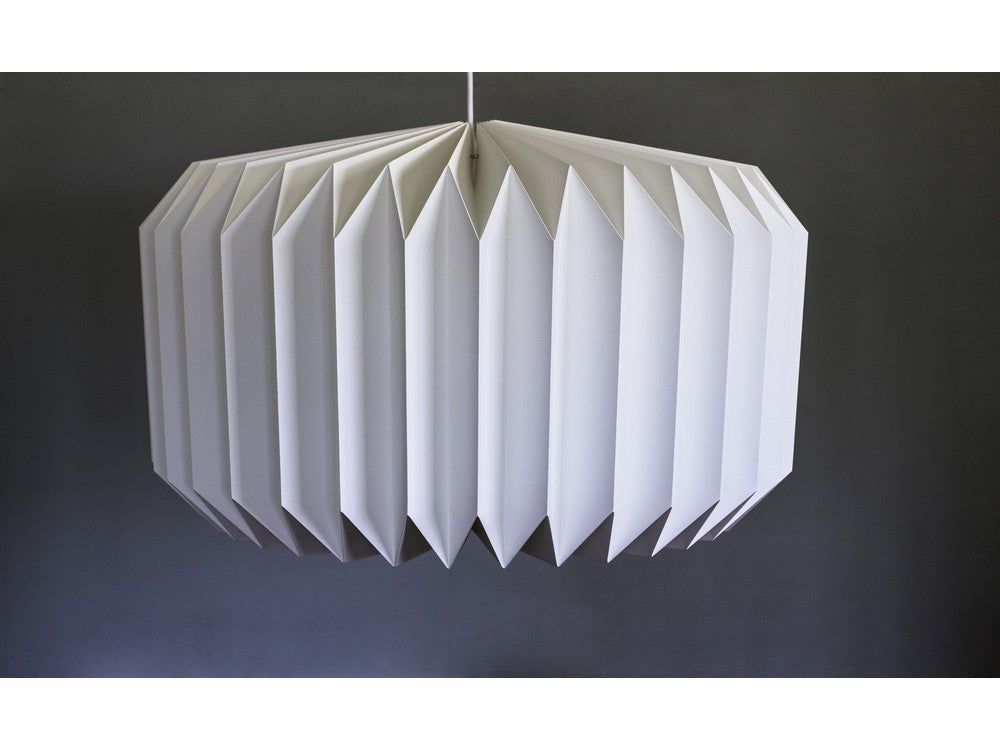
VFold Light Shade
$299.00
VFold light shade's simple and elegant geometric design brings a timeless look to any room. Handcrafted from one continuous sheet of heavy weight paper or synthetic (PU) paper, VFold is designed for a pendant light fitting and produces a bright, diffused ambient light. Material heavy grade paper or PU (synthetic white paper) Flat-packed for deli...
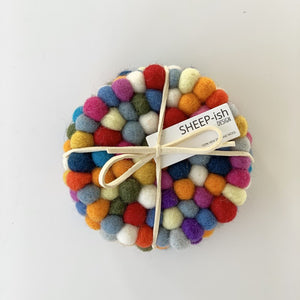

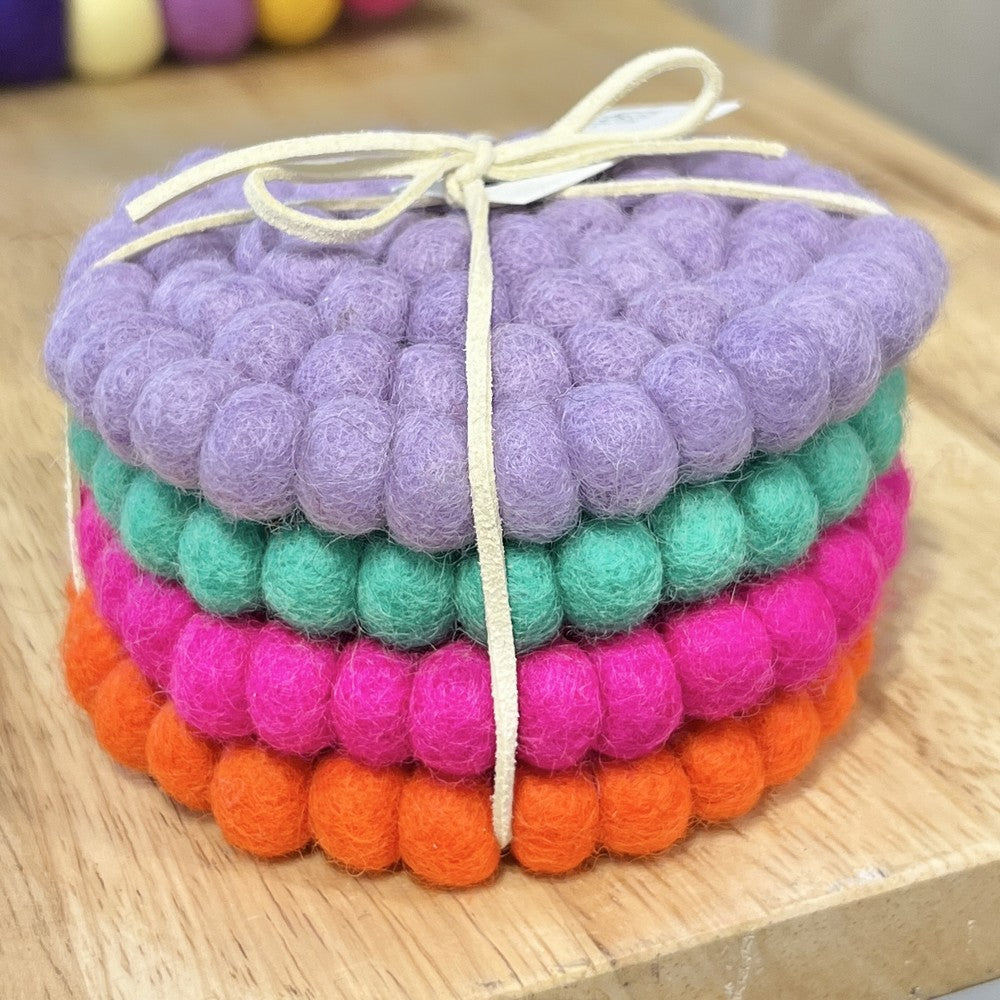
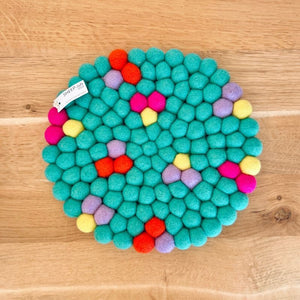
Felt Ball Coasters (Set of 4)
$29.00
These gorgeous Felt Ball Coasters (set of four) are handcrafted in Nepal, using 100% NZ wool and non-toxic dyes, and beautifully tied-up in leather. Machine washable on a wool cycle. Please note, due to the natural handmade nature of this product, colour and diameter can vary slightly. Material 100% NZ wool (hand-felted in Nepal), non-toxic dyes...
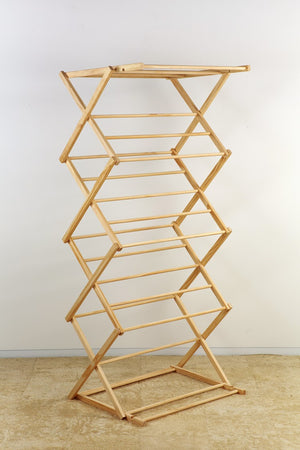
Tower Dryer 2.0
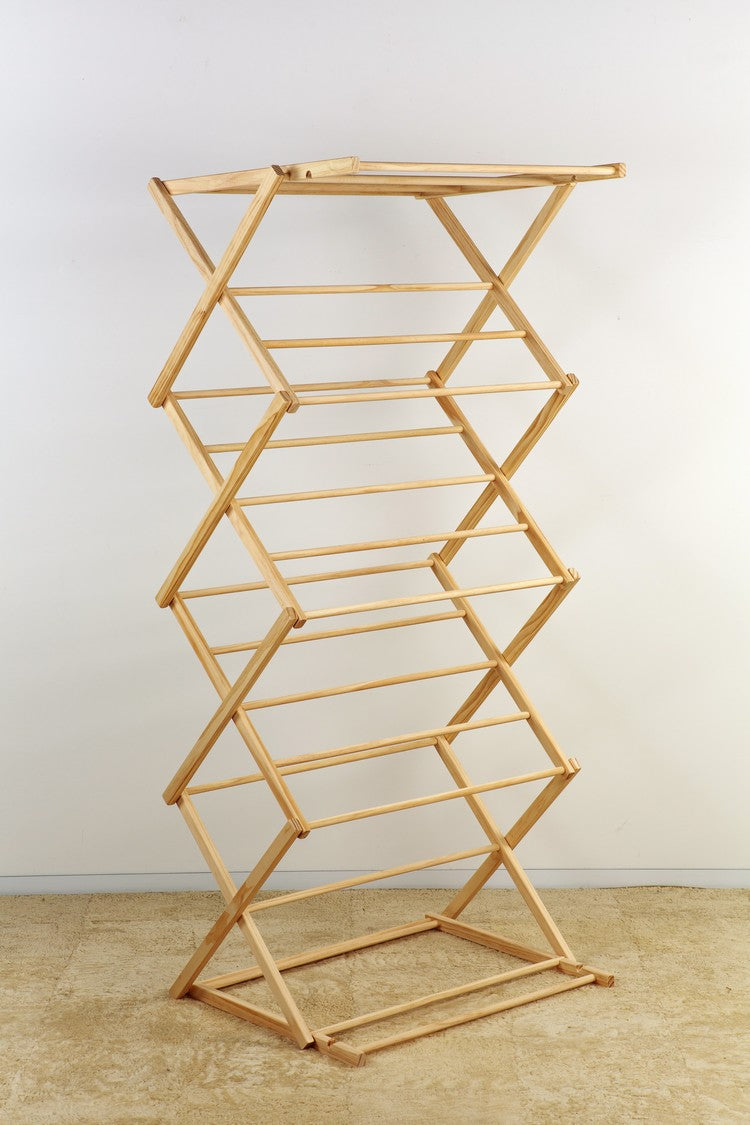
Tower Dryer 2.0
$289.00
Handcrafted, wooden Tower Dryer 2.0 has a built in top rack and additional rungs, providing considerably more hanging space (13.6m) than the original version (8.16m). The top rack is great for hanging delicate items, or laying out your woollen garments. The simple, smart design folds away for easy, compact storage whilst not in use. Material r...

Willowby Cube
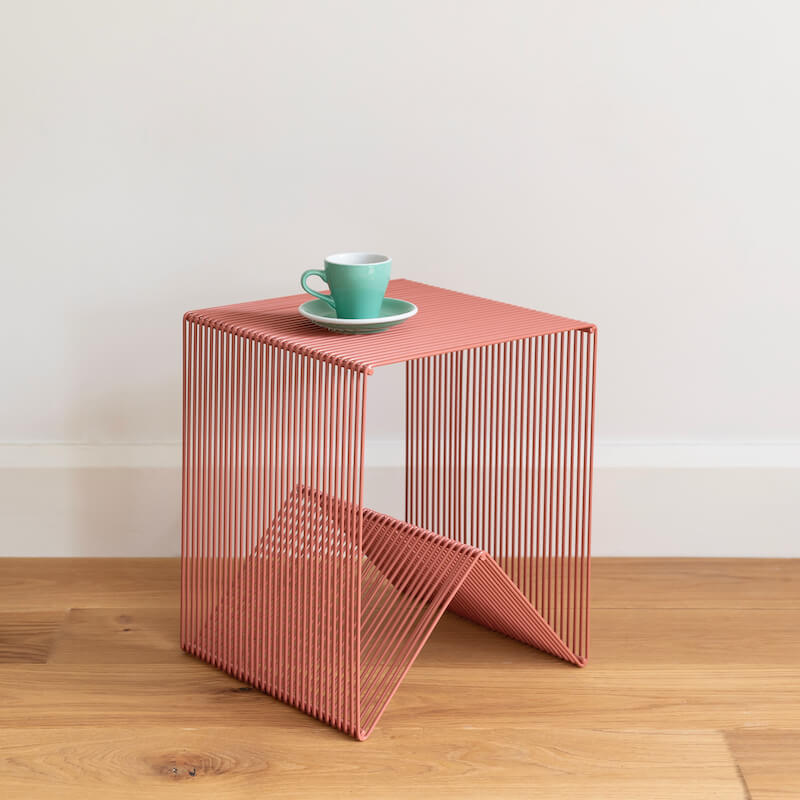
Willowby Cube
$379.00
Willowby cube has a 70’s vibe and more uses than most things you own. It's a great side table and magazine rack, a footstool, an extra seat for than unexpected guest (same seat height as a standard chair). It's strong enough to stand on to reach those higher spots and can be used in multiples to create interesting design spaces. Indoors use only...
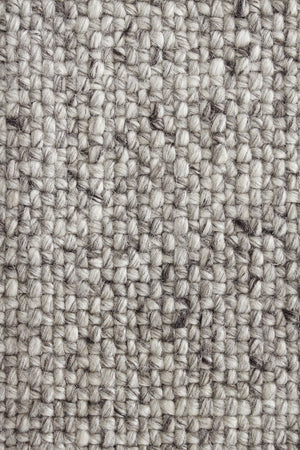
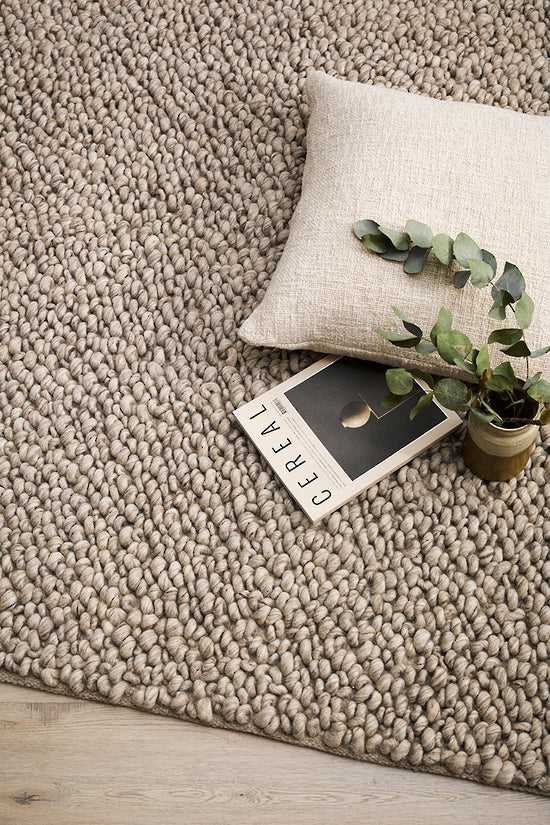
Nebraska Floor Rug
Nebraska Floor Rug
$899.00
Create a timeless living space with the with the beauty of this wool-blend floor rug. Handwoven in a simple 1-1 weave, the Nebraska adds warmth and interest with its subtle mottled tones and versatile structure. A staple for contemporary living. Material 50% wool, 50% viscose with cotton backing / handwoven textured - 10mm pile This product can ...
Te Reo Ceramic Coaster
Te Reo Ceramic Coaster
$8.00
Cork backed, Te Reo Ceramic Coaster featuring simple Te reo Māori expressions. Material ceramic, cork (back) Size 100Dia x 6D mm

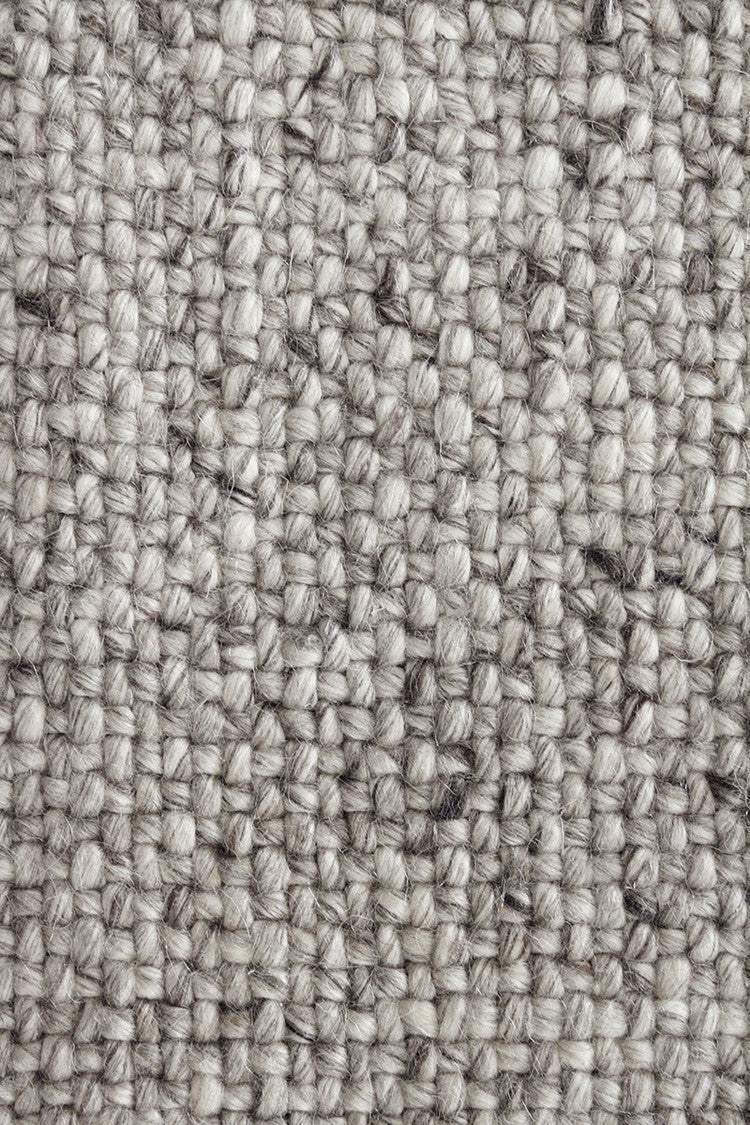
Mackenzie Floor Rug

Mackenzie Floor Rug
$1,199.00
Lift the ambience of your room with the stunning texture of the Mackenzie floor rug. Handwoven from a blend of New Zealand wool, the generous loop pile will create a relaxed and natural feel in your interior. The subtle colourways make this an effortless piece to style around. Material 100% wool (20mm pile) This product can be tailor-made i.e. a...
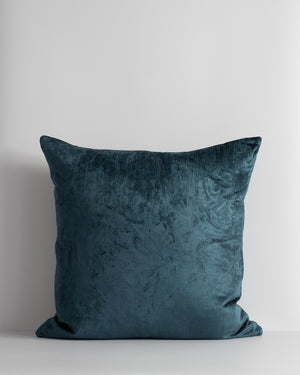
Bromley Cushion
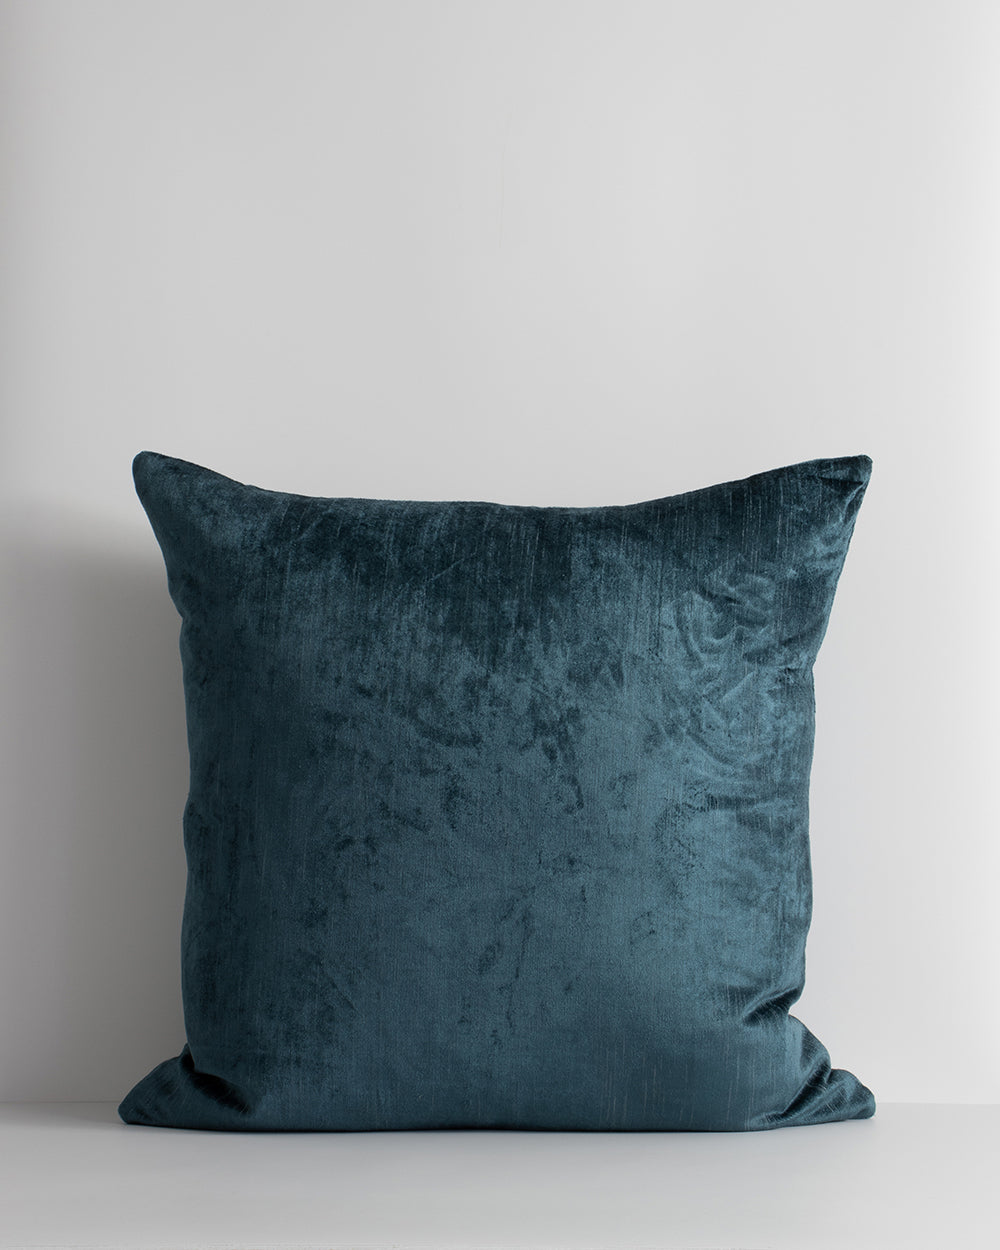
Bromley Cushion
$99.00
Embrace contemporary luxury with Bromley cushion - a fine woven cotton and viscose slub velvet with a clean knife edge finish. Double-sided with a lustrous sheen, the two sizes and six sophisticated shades create an effortlessly refined aesthetic. Material 70% cotton / 30% viscose (outer), feather (inner) Check out other Essential cushions.

Wire Fruit Bowl
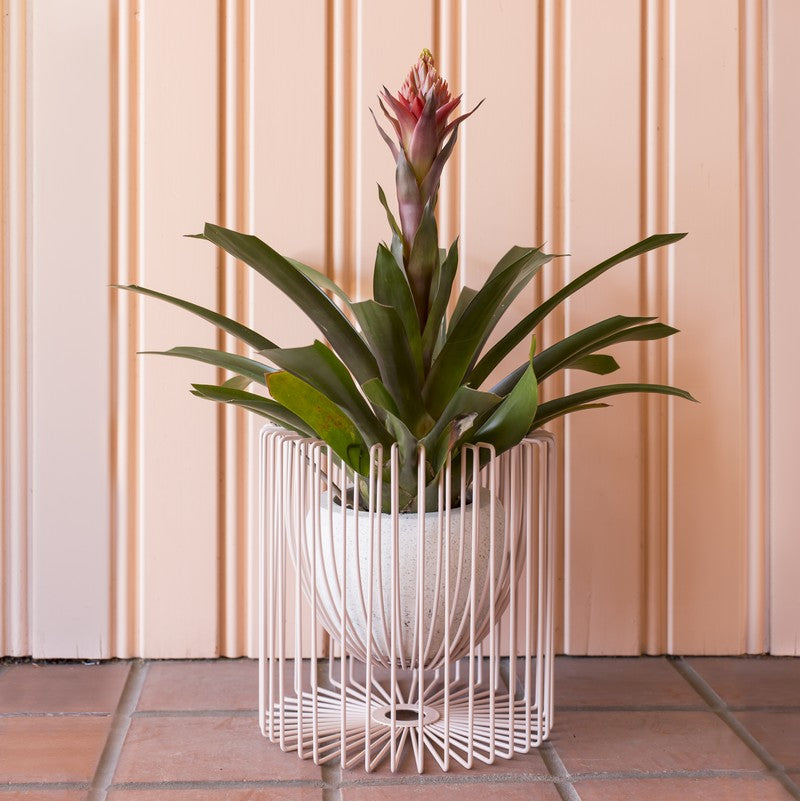
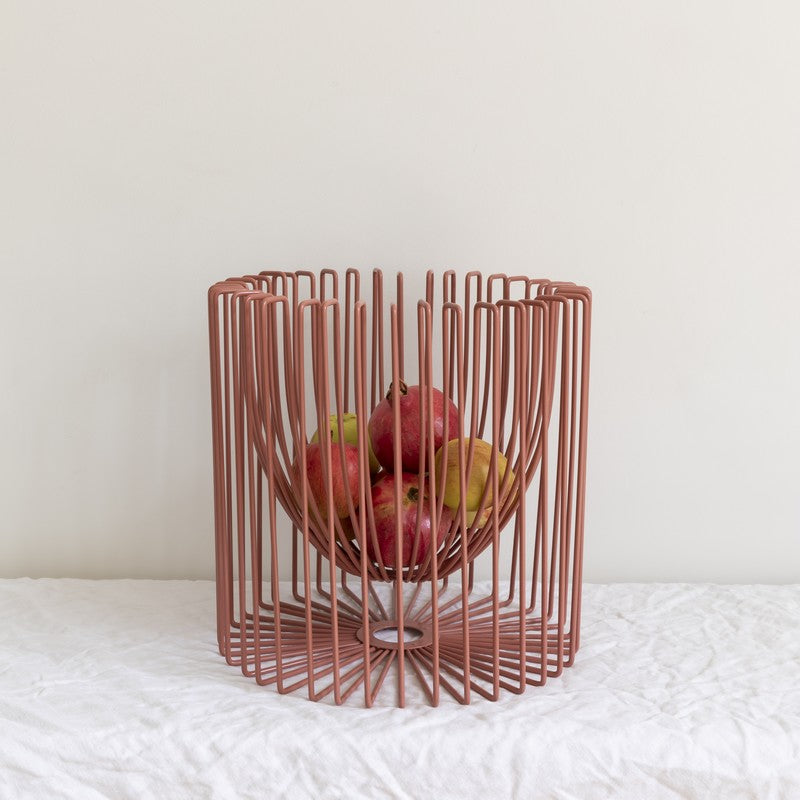
Wire Fruit Bowl
$169.00
Wire fruit bowl is shaped and molded using traditional handcrafting methods. The inner bowl allows your fruit to “float” in mid-air. Alternatively, you may choose to use this striking piece to show-off your prized pot plant. Indoors use only. Material powder-coated steel rod Size 300Dia x 300H mm This product can be tailor-made. It may be an opt...

Outline Round Wall Mirror
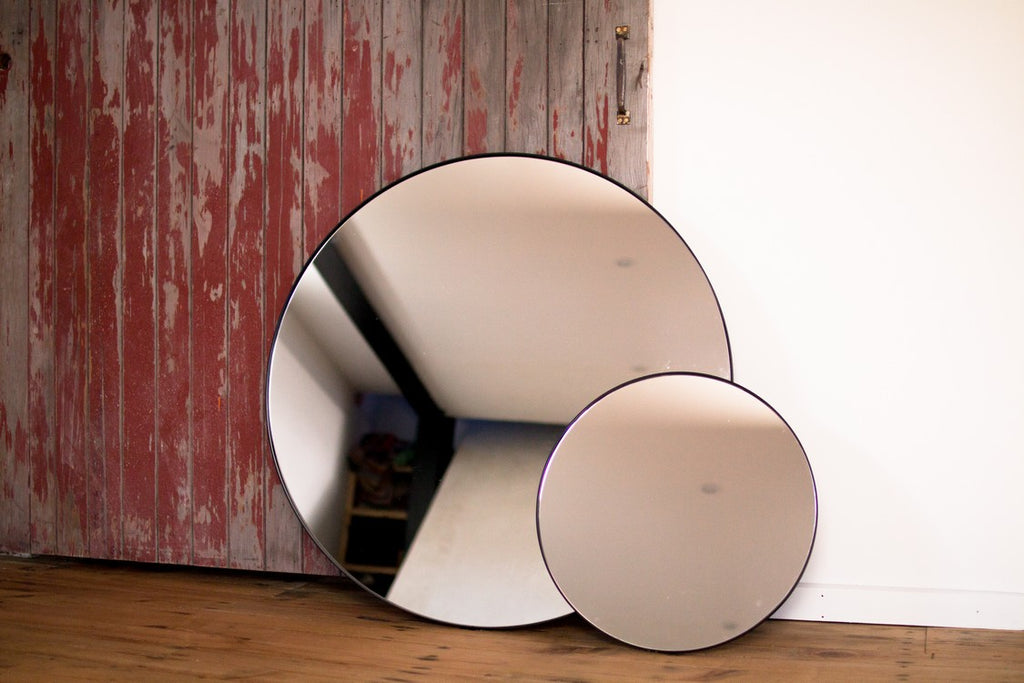

Outline Round Wall Mirror
$999.00
Sleek Outline Round Wall Mirror is framed with a subtle band of powder-coated steel, brass (polished or brushed), or satin brushed stainless steel. Available in three standard sizes or request a custom size to suit you. Material 4mm silver backed edge sealed mirror glass; marine plywood backing; powder-coated steel (black or white), brass (polis...

Felt Dryer Balls (Set of 3)
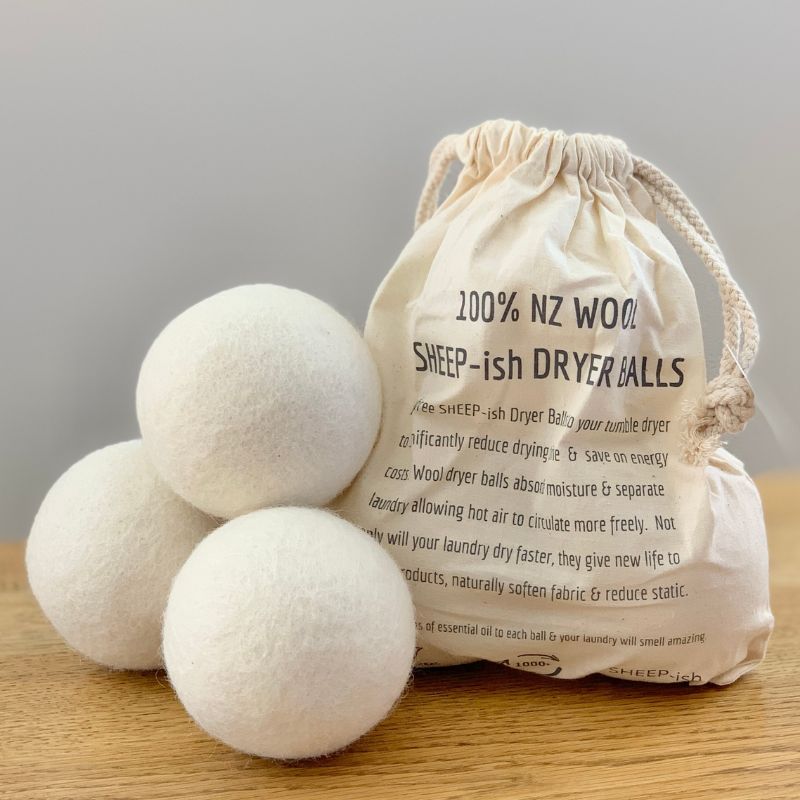
Felt Dryer Balls (Set of 3)
$29.00
Add these Felt Dryer Balls (set of 3) into your tumble dryer to significantly reduce drying time and save on energy costs. They will absorb moisture and separate your laundry, allowing hot air to circulate more freely. Not only will your laundry dry faster, these Felt Dryer Balls reduce static and naturally soften fabric. Air-dry the balls betwe...
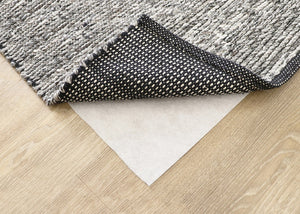
Anti-Slip Rug Underlay

Anti-Slip Rug Underlay
$89.00
Anti-Slip Rug Underlay is adhered to floor rugs and mats to prevent them from slipping or creeping on any floor surface. It's suitable for practically any surface; carpets, ceramic tile, concrete, wood, laminate and vinyl floors, and can be used with underfloor heating. Anti-Slip Rug Underlay prolongs floor rug life, provides extra cushioning, a...
Bright Bird Clock

Bright Bird Clock
$119.00
Blonde wood framed Bright Bird Clock features a striking New Zealand native bird design. The silent movement clock is protected by a glass front and sits 45mm deep from the wall. Material blonde wood frame, glass front, silent movement Size 320Dia x 45D mm
Felt Ball Pot Stand

Felt Ball Pot Stand
$49.00
This gorgeous Felt Ball Pot Stand is handcrafted in Nepal, using 100% NZ wool and non-toxic dyes. It makes a perfect addition to a table setting, not only protecting surfaces from hot dishes, but also adding a touch of texture to the space. Machine washable on a wool cycle. Please note, due to the natural handmade nature of this product, colour ...
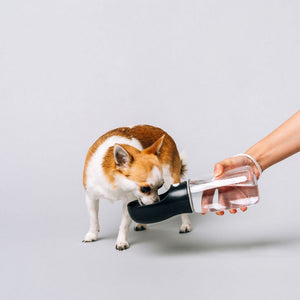
Thirsty Dog Drink Bottle

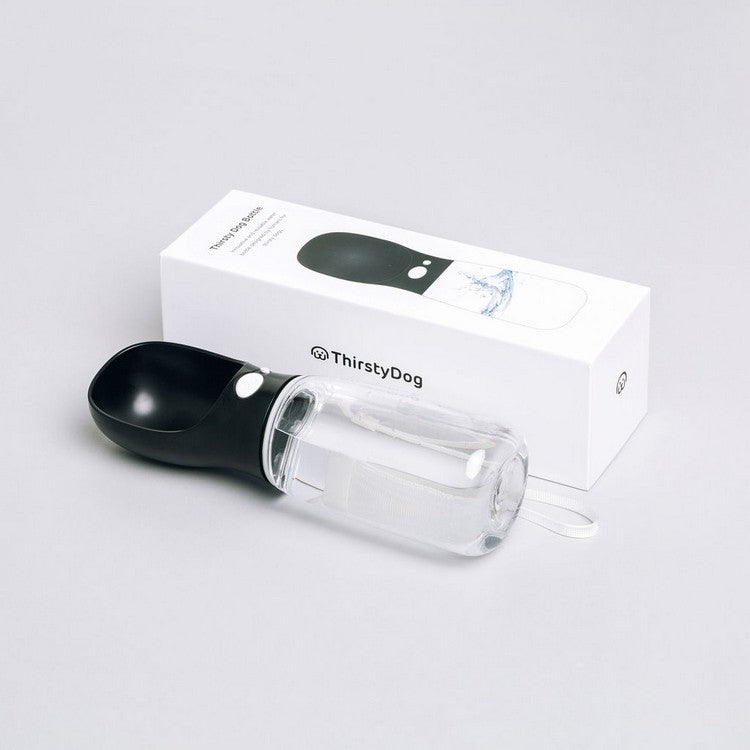
Thirsty Dog Drink Bottle
$59.00
Thirsty Dog Drink Bottle is an elegant, reusable drinking reservoir tailored for your pooch. You can hydrate any sized dog in style, on demand, anywhere you and your best 'friend' go. Fully leak-proof thanks to a unique water locking valve system, Thirsty Dog Drink Bottle is convenient and easy to use. Simply fill the cup with water from the pre...
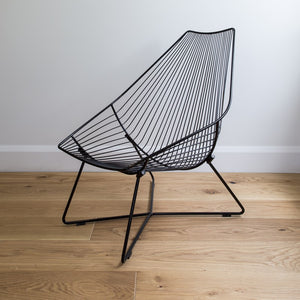
Piha Wire Lounger
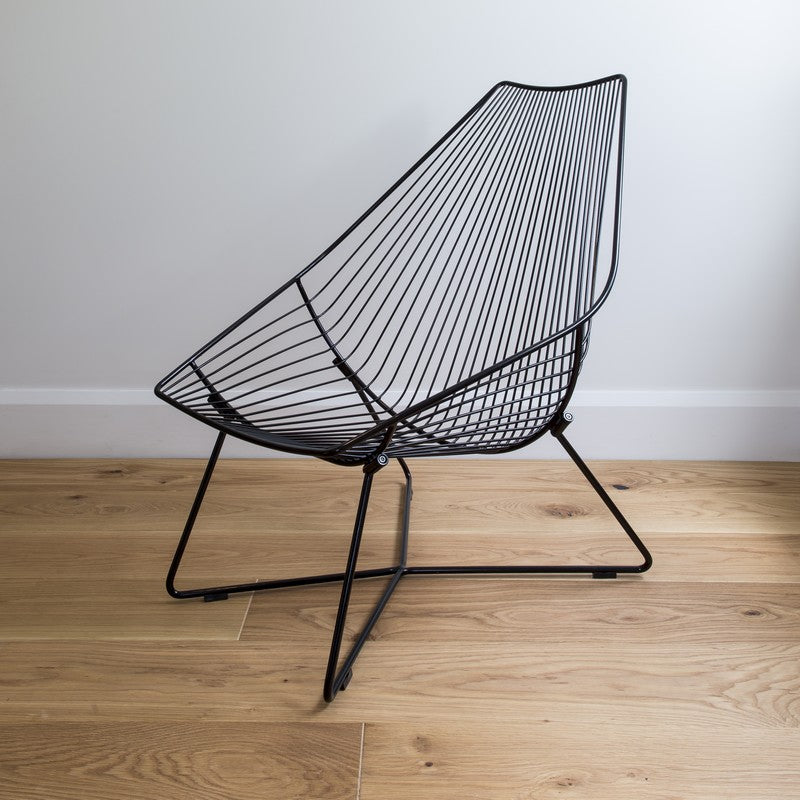
Piha Wire Lounger
$539.00
Piha wire lounger is a laid back, chilling out chair. It's not too low that you can't get out, but so super comfy that you may not want to! A specialised basecoat that aids durability and rust resistance, means Piha can be used in sheltered outdoor areas away from the coast and swimming pools. However, if you’re susceptible to salt winds or humi...
Old Masters Placemat

Old Masters Placemat
$19.00
A placemat featuring one of the artworks from the Old Masters, Te Papa Collection. A Wet Day on a Wild Coast, Dunedin by William Hodgkins, 1894 Lake Manapouri by William Baker, circa 1900 Landscape with Settlers, Taranaki by Messenger Sisters, circa 1857 Mt. Cook by Charles Decimus Barraud, 1884 Paekakariki by John Gully, 1883 Wellington Harbou...
Tiki Hook


Tiki Hook
$49.00
Looking for somewhere to hang your coat? Look no further than Tiki Hook, a clever twist on the iconic east Polynesian figure - the Tiki is a symbol of good luck. Tiki Hook was inspired by the wonderfully carved figures on the walls of a Waitangi Marae. Material galvanised steel 1.95mm thick; powder-coated for indoor or outdoor use Size 90W x 60D...


