* Annual SALE : 1-31 March 2025. Save 15% Online by using the code 'MARCH15%OFF' at checkout. Excludes : Bart de Vries, Gus Leen, Tim Webber, tailor-made, gift vouchers and items already reduced. No refunds or exchanges on sale items.
* SALE Code : MARCH15%OFF
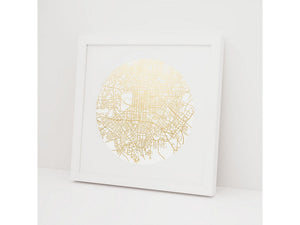
Foil Print - Christchurch

Foil Print - Christchurch
$129.00
Kiwiana gold Foil Print - Christchurch, select between stunning black on black or contemporary white on white. Material print matt mounted in wooden frame, glass front Size 310 x 310 mm (print 200Dia) You may like other items in the Foil Print series.

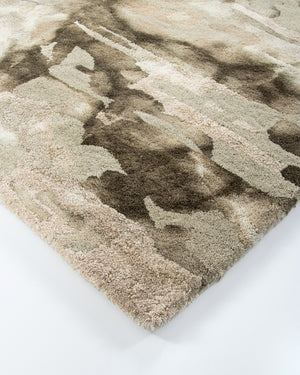
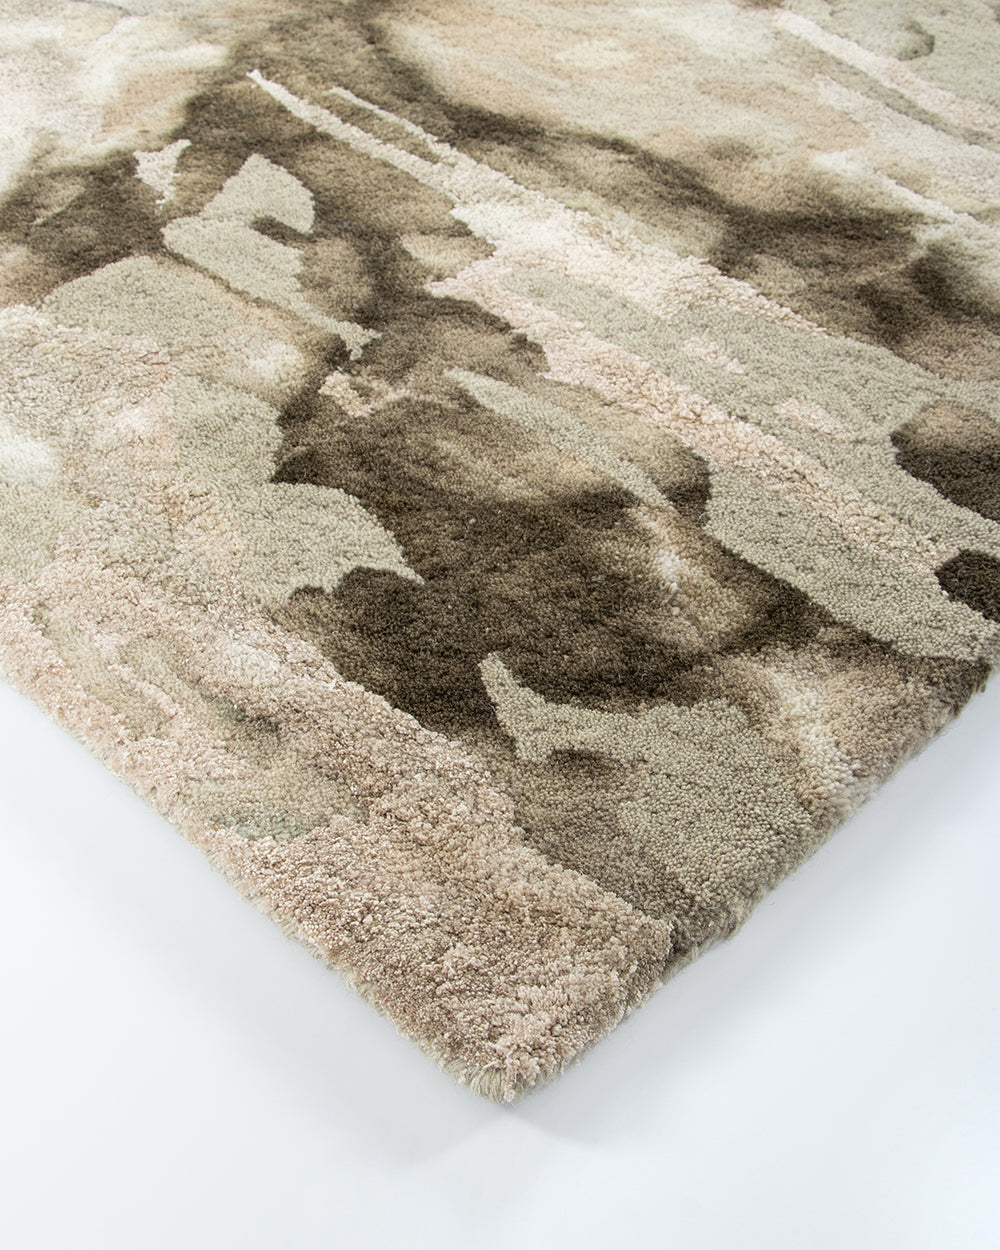
Anchorage Floor Rug


Anchorage Floor Rug
$899.00
Bring nature into your home with the handmade Anchorage floor rug woven in natural fibres. A blend of bamboo silk and jute yarns gives the tufted surface subtle colour graduations, while the gravel, golden sand or natural stone tone lays the foundation for a thoughtfully crafted, earthy interior. Material 60% bamboo silk, 40% jute with cotton b...
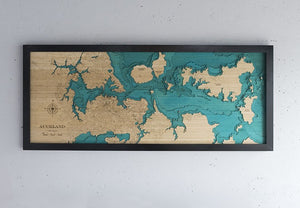
3D Wooden Chart - Auckland Harbour

3D Wooden Chart - Auckland Harbour
$2,499.00
Designed and made in Lyall Bay, Wellington, the 3D Wooden Chart range is handcrafted using layered bamboo plywood; a by-product of plantation bamboo shoots grown for the restaurant industry. Each layer is hand-sanded and then dyed with non-toxic stains. Rounding off the construction is a wooden frame made from New Zealand grown plantation pine,...

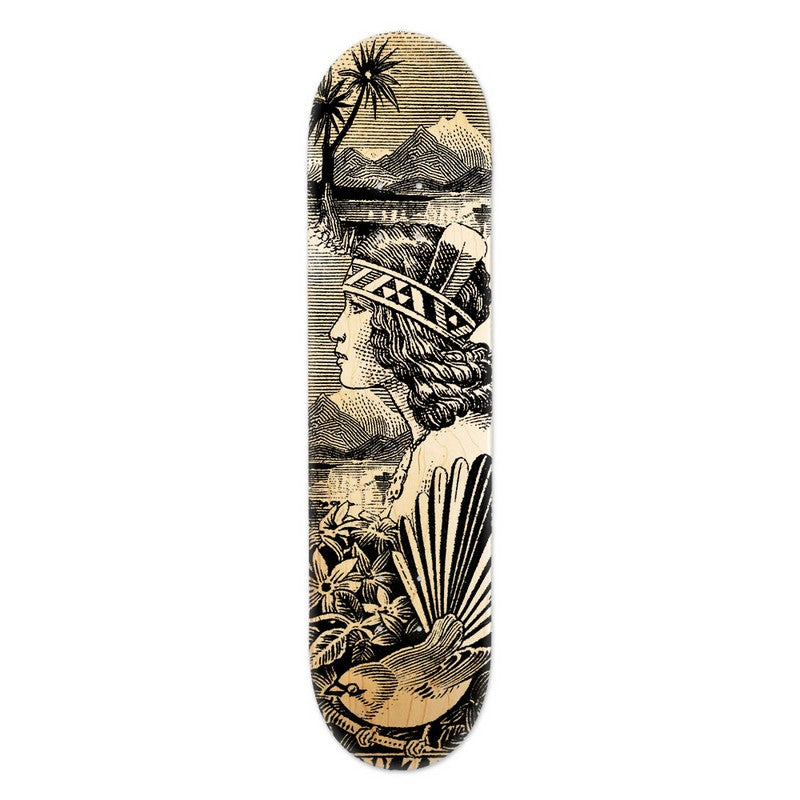
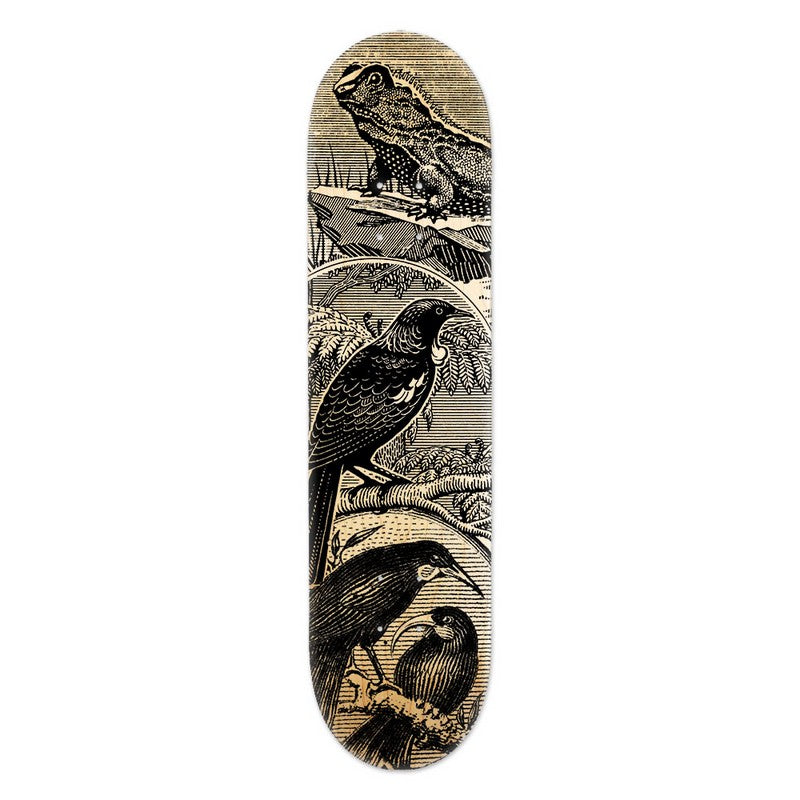
Skateboard Deck Art - Wahine Stamp
$169.00
Canadian maple skateboard deck featuring the Wahine stamp design - New Zealand icons originating from vintage woodcuts. To be hung on the wall as a contemporary art piece. Printed in New Zealand Material Canadian maple with nylon hanger - ready to hang on a picture hook or nail Size 800 x 200 mm Check out other Skateboard Deck Art


Collectible Stamp Magnets
$9.00
Designed in New Zealand with artwork by Glenn Jones, these vibrant Collectible Stamp Magnets bring a touch of nostalgia and Kiwi charm. Choose from twelve unique designs - or collect them all! Lightweight and easy to send, they make the perfect gift for friends and family near or far. Material metal & magnet Size 40 mm

Tokyo Roaming Rug
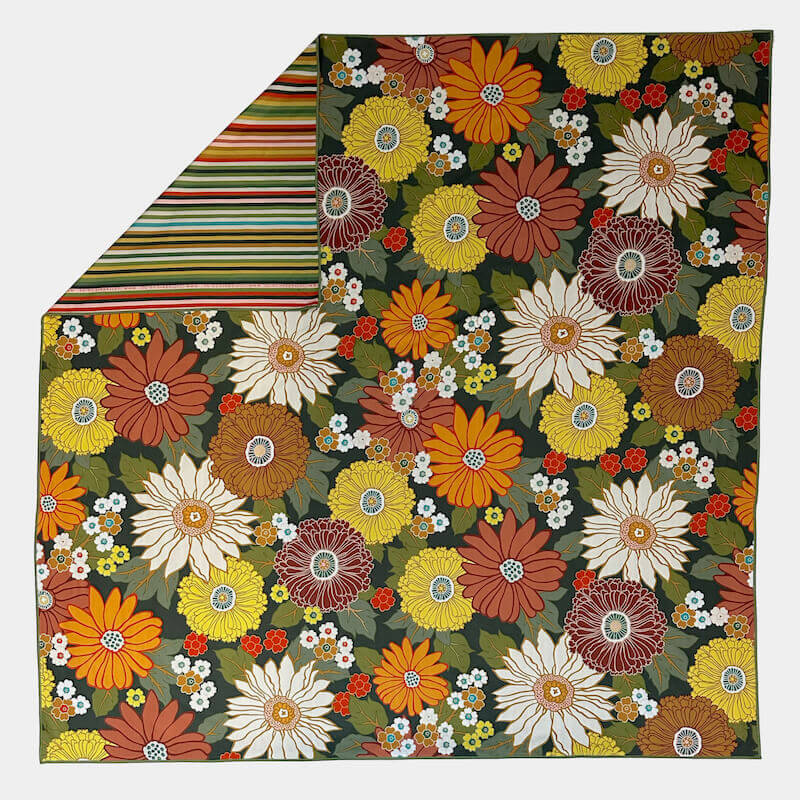
Tokyo Roaming Rug
$99.00
The Tokyo Roaming Rug, is a handy picnic blanket, throw rug and wrap, all rolled into one. Both sides of the soft feel, moisture absorbent and sand resistant material feature an original design. Each roaming rug comes in a draw string carry bag, for tidy at-the-ready storage for those spur of the moment adventures. Recommended to cold wash separ...
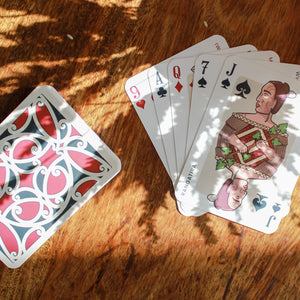
Kāri Māori Playing Cards

Kāri Māori Playing Cards
$34.00
Kāri Māori Playing Cards celebrate the Māori language and culture, and support local creatives, makers and businesses. The cards will become a treasured taonga for whānau encouraging play, laughter, unity, and learning. Inside the pack you will find a QR code which will take you to behind the scenes videos of artist Jordyn Daniels explaining her...


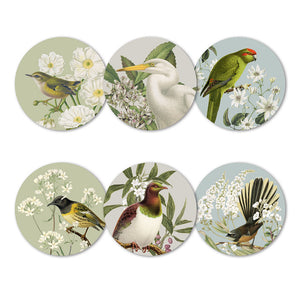
Birds & Botanicals of NZ Placemats (Set of 6)
$69.00
A beautifully boxed set of six placemats featuring Birds & Botanicals of New Zealand (NZ). Each coaster is different. The coasters are heat resistant, hard wearing and an ideal gift to send by post. Wipe clean only. Material print on coated MDF, cork backed Size 290Dia mm Check out other placemats & coasters

Birds & Botanicals of NZ Coasters (Set of 6)
$39.00
A beautifully boxed set of six coasters featuring Birds & Botanicals of New Zealand (NZ). Each coaster is different. The coasters are heat resistant, hard wearing and an ideal gift to send by post. Wipe clean only. Material print on coated MDF, cork backed Size 100Dia mm Check out other placemats & coasters
Bright Botanical Kawakawa Cushion

Bright Botanical Kawakawa Cushion
$99.00
Give your sofa an instant uplift with a full colour, double-sided Bright Botanical Kawakawa cushion. Bright Botanical Kawakawa (with a polyester inner) is designed to be used outdoors, however we recommend storing the cushion during significant wet weather. Material polyester (outer) / feather or polyester (inner) Colour green-crimson Size 550 ...
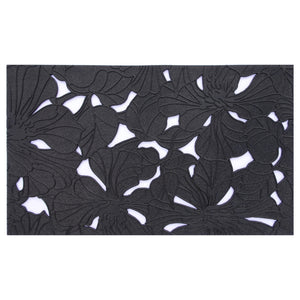
Water Lily Rubber Doormat
Water Lily Rubber Doormat
$49.00
The Water Lily doormat is perfect for your front door, patio or entranceway. It is made from ethically produced, phthalate free rubber and features holes for water to drain. This makes it ideal for outdoor use. Use the durable surface to scrape dirt and debris off the soles of your shoes. Material 100% rubber (GoodWeave and SMETA certified) Size...
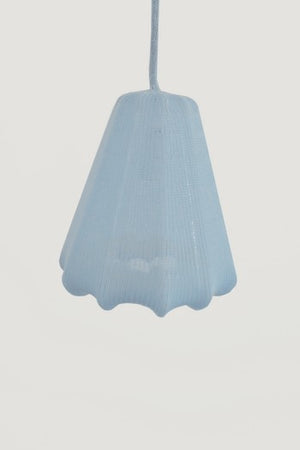
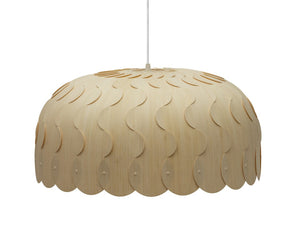
Shibui Pendant Light

Shibui Pendant Light
$99.00 $399.00
Floor-stock SALE - ONLY ONE LEFT Shibui (pronounced she-boo-e) is a Japanese word that refers to a particular aesthetic of simple, subtle and unobtrusive beauty. Shibui pendant light consists of a lightweight internal framework that crafts the elegant, faceted spun form. The frame is clothed in a digitally knitted soft New Zealand merino wool ja...


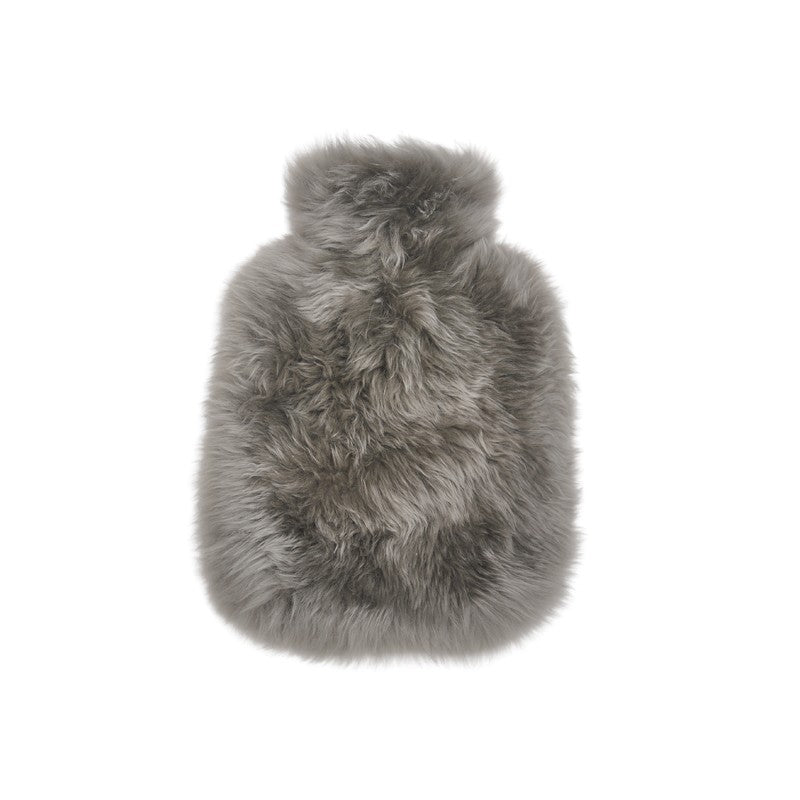
NZ Long Wool Hot Water Bottle Cover
$69.00
Snuggle up with a NZ Long Wool Hot Water Bottle Cover. Made from New Zealand sheepskin and featuring a cotton velvet reverse, these tactile comforters are designed to keep you cosy through the coldest months. Compatible with a 2L capacity hot water bottle (not included) Material NZ long wool sheepskin with cotton velvet reverse Size 350 x 230 m...

Canopy Cushion

Canopy Cushion
$109.00
Bring the vibrancy of the wilderness to your living spaces with the stylised design of the Canopy cushion. Drawing inspiration from the natural world, New Zealand fauna is interpreted through abstract shapes, hand-painted in deep green tones onto a cotton base. Style with textured Cyprian cushions in rosemary and sage tones. Lift the palette wi...
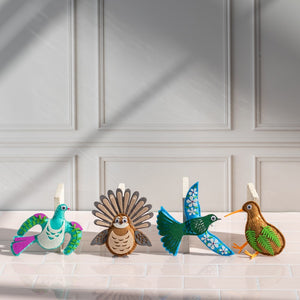
Felt Bird Decoration DIY Kit

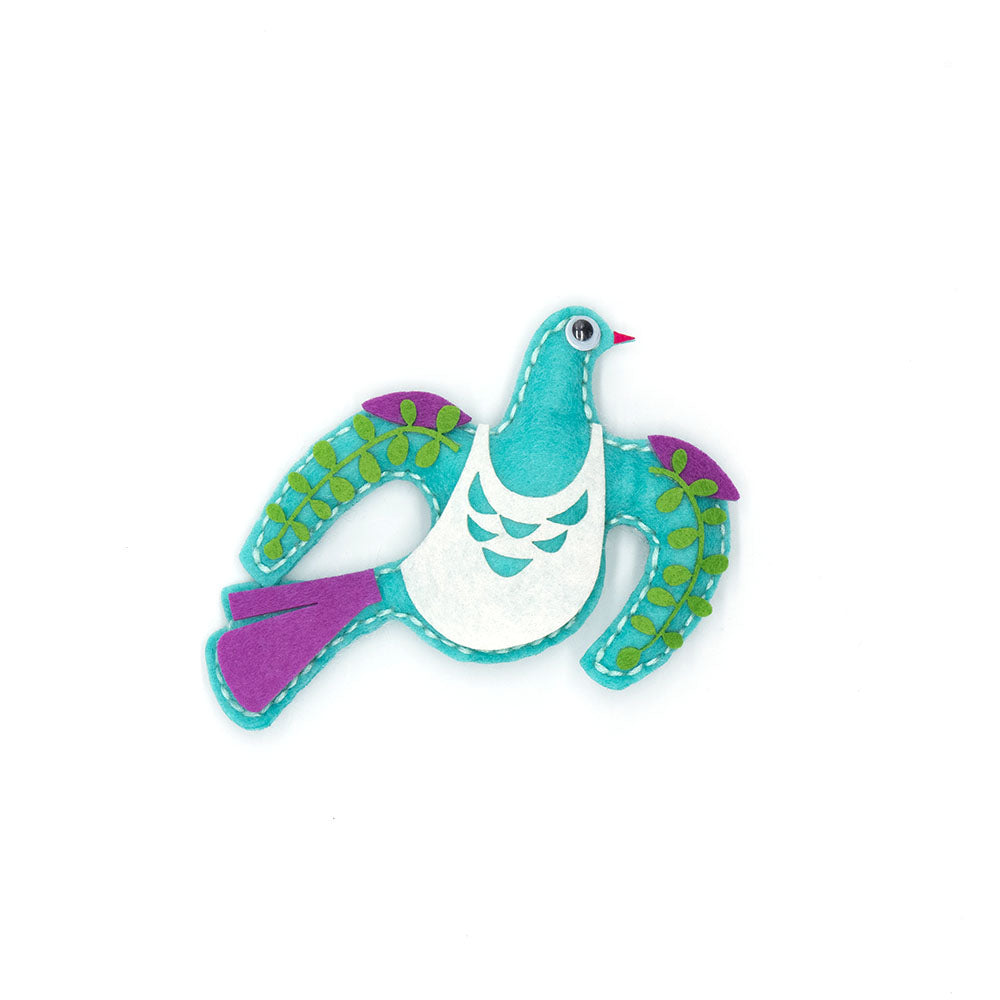
Felt Bird Decoration DIY Kit
$19.00
The Felt Bird Decoration DIY Kit is a great gift all year round. It promotes creativity and offers a sense of accomplishment with sentimental reward. Each kit comes complete with materials and easy-to-follow instructions, ensuring a delightful crafting experience. Dive into the world of creativity and surprise your loved ones with these heartfe...
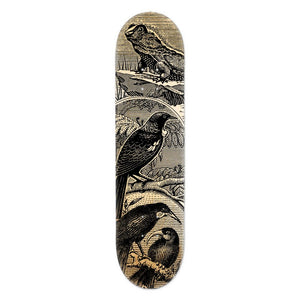
Skateboard Deck Art - Tuatara Stamp
$169.00
Canadian maple skateboard deck featuring the Tuatara stamp design - New Zealand wildlife icons originating from vintage woodcuts. To be hung on the wall as a contemporary art piece. Printed in New Zealand Material Canadian maple with nylon hanger - ready to hang on a picture hook or nail Size 800 x 200 mm Check out other Skateboard Deck Art

Hairy Dog Grooming Kit
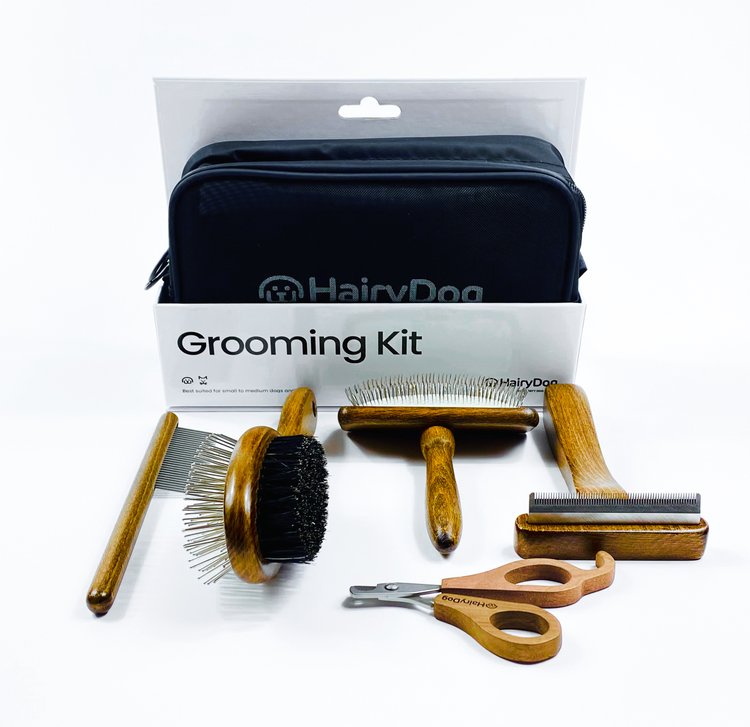
Hairy Dog Grooming Kit
$109.00
The Hairy Dog Grooming Kit is a curated collection of exquisite eco-concious, handcrafted, wooden grooming tools, arranged within a sleek and breathable bag, making it the perfect gift choice for cat and dog owners, or for yourself. Whether you're a novice or a seasoned pet owner, this kit equips you with all the essentials to keep your dog's or...
Beau Light Shade
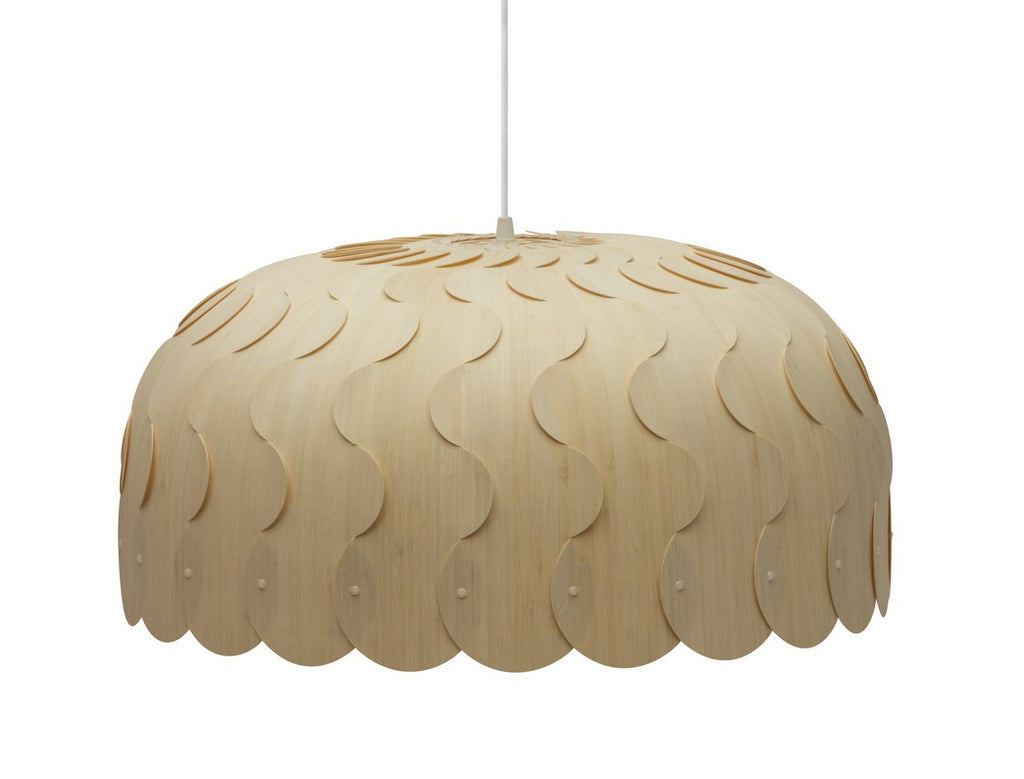
Beau Light Shade
$765.00
The Beau light shade was developed by David Truebridge Design Studio. The gentle overlap of the individual panels invoke the ripple of waves, in keeping with the natural theme of the David Truebridge collection. Use Beau to create atmosphere and drama. Beau's open form spreads light downwards, making it a perfect option for hanging over work ar...

Benmore Stainless Steel Bench
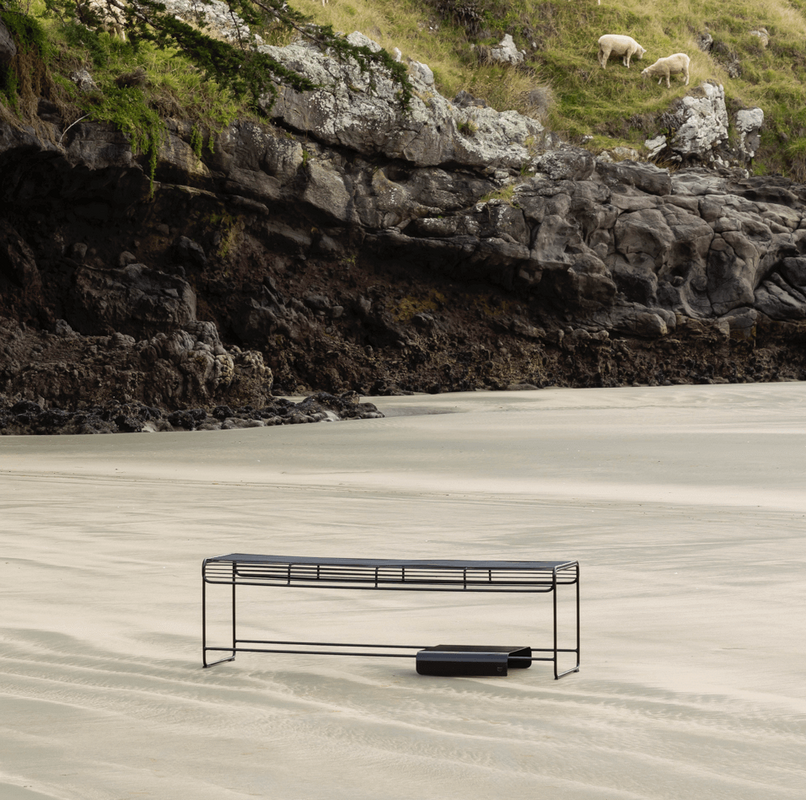
Benmore Stainless Steel Bench
$1,199.00
The Benmore stainless steel bench is made for the great outdoors! New Zealand’s climate is harsh, especially along our coastlines with their salty sea winds. Stainless steel is the best defence against sea spray, ocean winds, humidity and high rainfall areas. It is a strong, durable base material with increased corrosion resistance. Investing in...
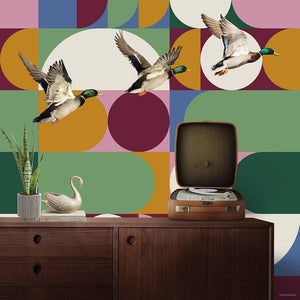

Sue Skellern Print - Mrs Ogden Ducks
$249.00
Born and raised in the Bay of Islands surrounded by a creative family, Sue Skellern embraced the creative sector. Her art industry career evolved from being a graphic designer, and product developer to a display artist in the New Zealand Army, and then onto the museum sector where she spent many years as an exhibition designer. After years of wo...

Rotoiti Stainless Steel Table

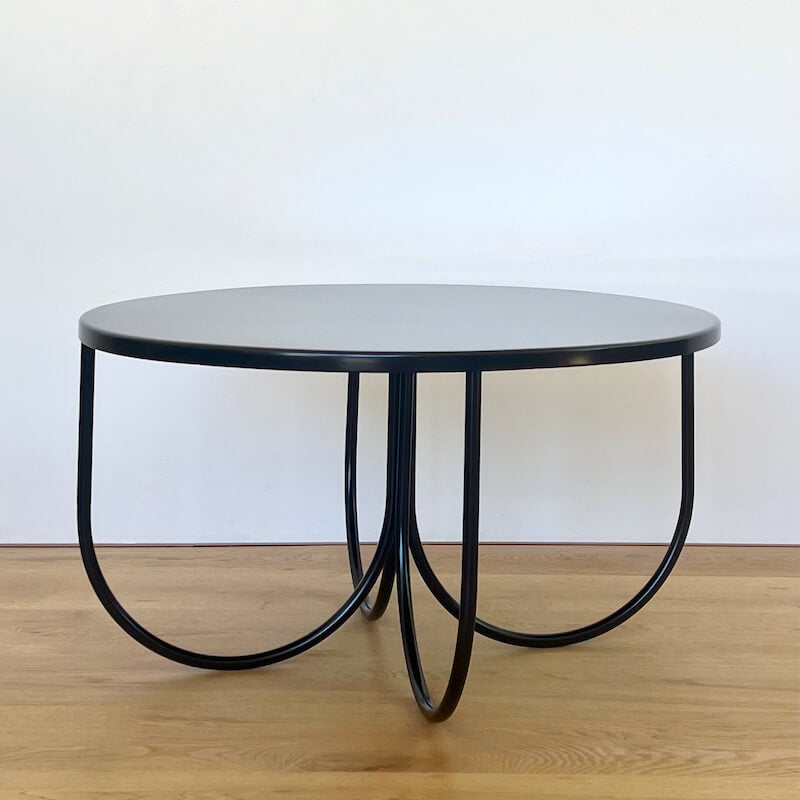
Rotoiti Stainless Steel Table
$629.00
The Rotoiti stainless steel table is made for the great outdoors! New Zealand’s climate is harsh, especially along our coastlines with their salty sea winds. Stainless steel is the best defence against sea spray, ocean winds, humidity and high rainfall areas. It is a strong, durable base material with increased corrosion resistance. Investing in...

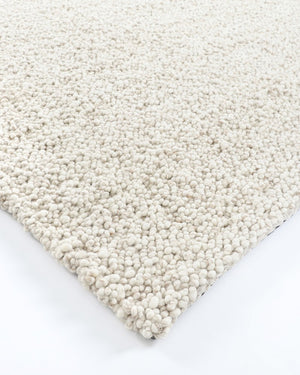
Sandringham Floor Rug


Sandringham Floor Rug
$1,199.00
Create a sophisticated sanctuary with the dense, sumptuous pile of the Sandringham floor rug. Soft and supportive underfoot, this collection is hand-knotted from 100% wool, with a cut pile and delicate fringing at both ends. The rich colourways and timeless design makes the Sandringham an easy addition for a luxurious interior. Material 100% wo...
Mt Somers Floor Rug

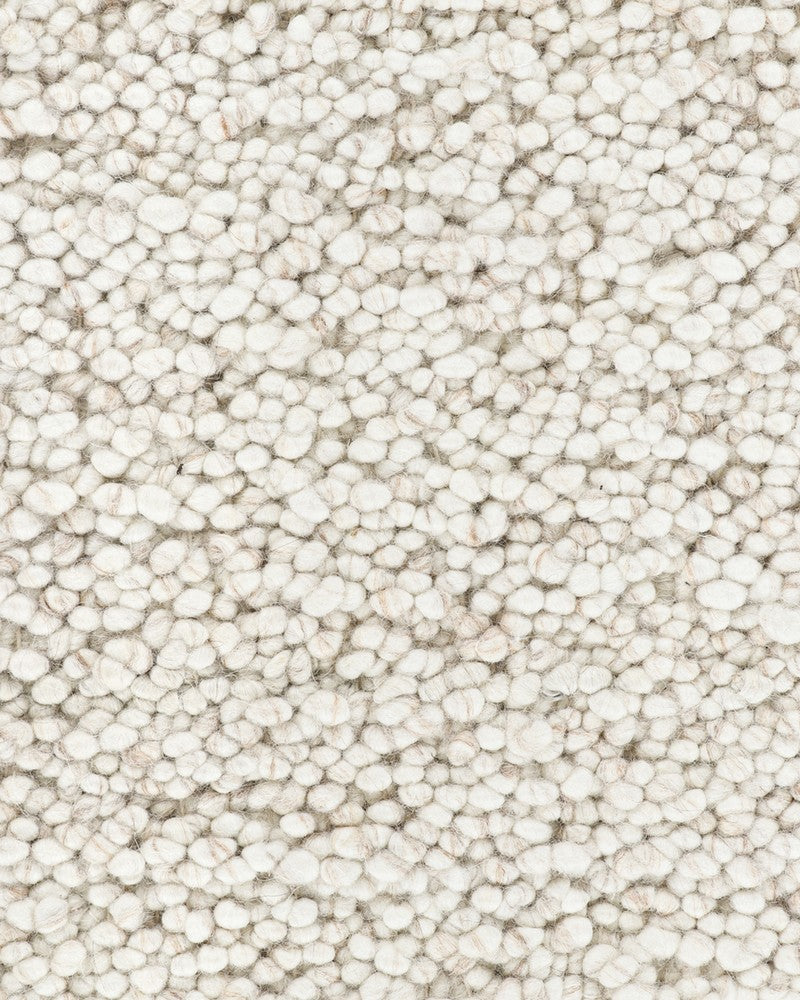
Mt Somers Floor Rug
$1,099.00
A visual and textural delight, Mt Somers floor rug strikes the perfect balance between statement piece and casual simplicity. Featuring a tight, popcorn-style weave, this rug looks impressive and feels equally as divine underfoot. Crafted by artisans from 100% wool, the warm neutral colourways are a stylish and effortless addition to any room. M...

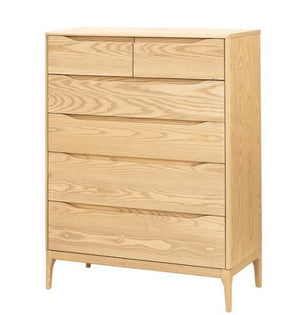
Havelock Tallboy
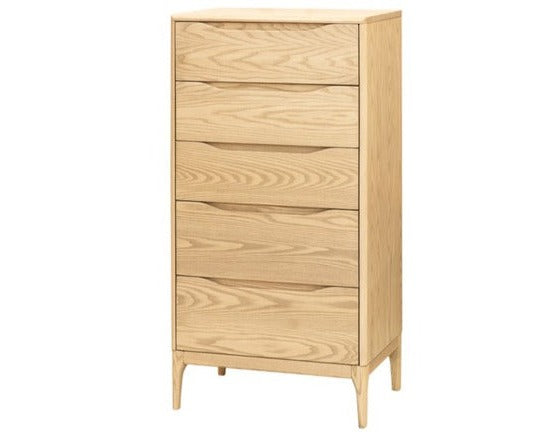

Havelock Tallboy
$2,199.00
The Havelock bedroom range is a refined, contemporary design made from American ash timber and handcrafted here in New Zealand. Havelock features soft curved detailing with carved inset drawer pulls, and finely moulded tops and feet. These sculptural elements provide beautiful tactile detail, allowing the range to fit into any home with its eleg...
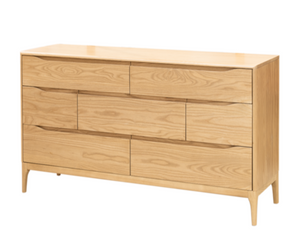
Havelock Lowboy

Havelock Lowboy
$2,899.00
The Havelock bedroom range is a refined, contemporary design made from American ash timber and handcrafted here in New Zealand. Havelock features soft curved detailing with carved inset drawer pulls, and finely moulded tops and feet. These sculptural elements provide beautiful tactile detail, allowing the range to fit into any home with its eleg...
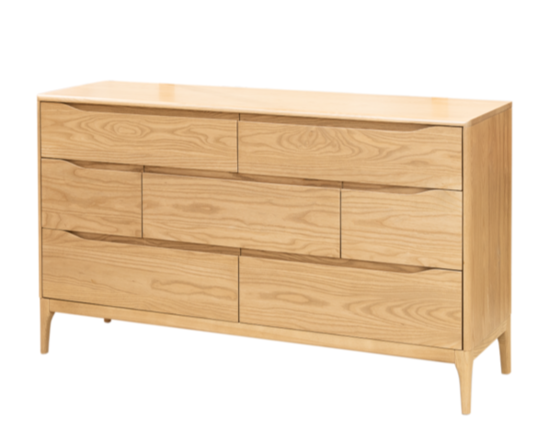
Havelock Chest

Havelock Chest
$2,699.00
The Havelock bedroom range is a refined, contemporary design made from American ash timber and handcrafted here in New Zealand. Havelock features soft curved detailing with carved inset drawer pulls, and finely moulded tops and feet. These sculptural elements provide beautiful tactile detail, allowing the range to fit into any home with its eleg...


Fishes of NZ Placemats (set of six)
$69.00
A beautifully boxed set of six placemats featuring Fishes of New Zealand (NZ). Each placemat is different. The placemats are heat resistant, hard wearing and an ideal gift to send by post. Wipe clean only. Material print on coated MDF, cork backed Size 290Dia mm Check out other placemats & coasters
Fayette Floor Rug
Fayette Floor Rug
$1,099.00
Add a stunning focal point to your space with the distinct design of Fayette floor rug. Inspired by forms in nature, the unique patterning is achieved through a specialised over-dyeing process applied to a handtufted base. Handwoven in a soft wool-viscose blend, this luxurious floor rug features gently shimmering details and adds an uplifting se...

Anna Evans Print - Through The Pongas
$229.00
Versatile creative, Anna Evans says “my passion is painting, my profession is design and illustration, my exploration is ceramics”. A 2004 graduate of Elam School of Fine Arts specialising in painting, Evans has illustrated over 100 books, created Vector art for numerous ipad games, android apps and education learning aids, and facilitated large...

Anna Evans Print - Maitai Bay
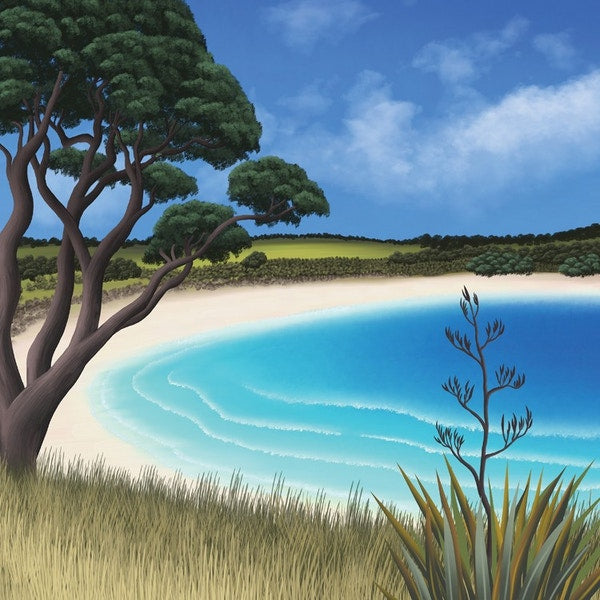
Anna Evans Print - Maitai Bay
$229.00
Versatile creative, Anna Evans says “my passion is painting, my profession is design and illustration, my exploration is ceramics”. A 2004 graduate of Elam School of Fine Arts specialising in painting, Evans has illustrated over 100 books, created Vector art for numerous ipad games, android apps and education learning aids, and facilitated large...
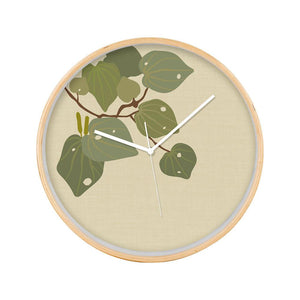
Raw Botanical Wooden Frame Clock

Raw Botanical Wooden Frame Clock
$119.00
Blonde wood framed Raw Botanical Clock, featuring well-known New Zealand native flora. The silent movement clock is protected by a glass front and sits 45mm deep from the wall. Material blonde wood frame, glass front, silent movement Size 320Dia x 45D mm
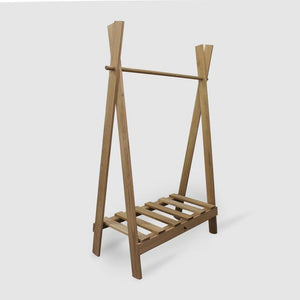
Wooden Clothes Rack with Shelf
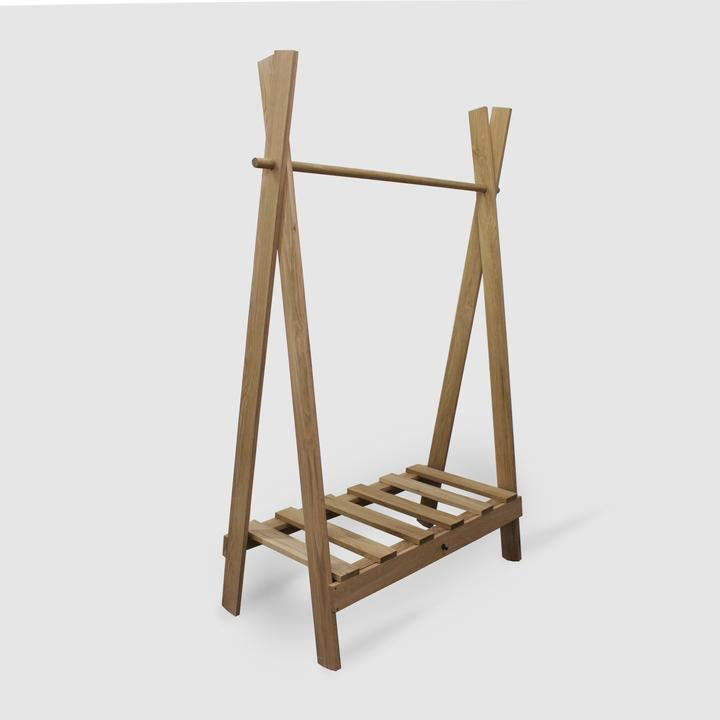
Wooden Clothes Rack with Shelf
$649.00
Foldaway, stylish, wooden clothes rack with shoe shelf. Designed and handcrafted in New Zealand. Material solid oak Size 1200L x 500W x 1800H (1400 to rail) mm Flat-packed for delivery.


